Showing posts with label Rustic Refined. Show all posts

Friday, May 9, 2014

Before and After: Nursery

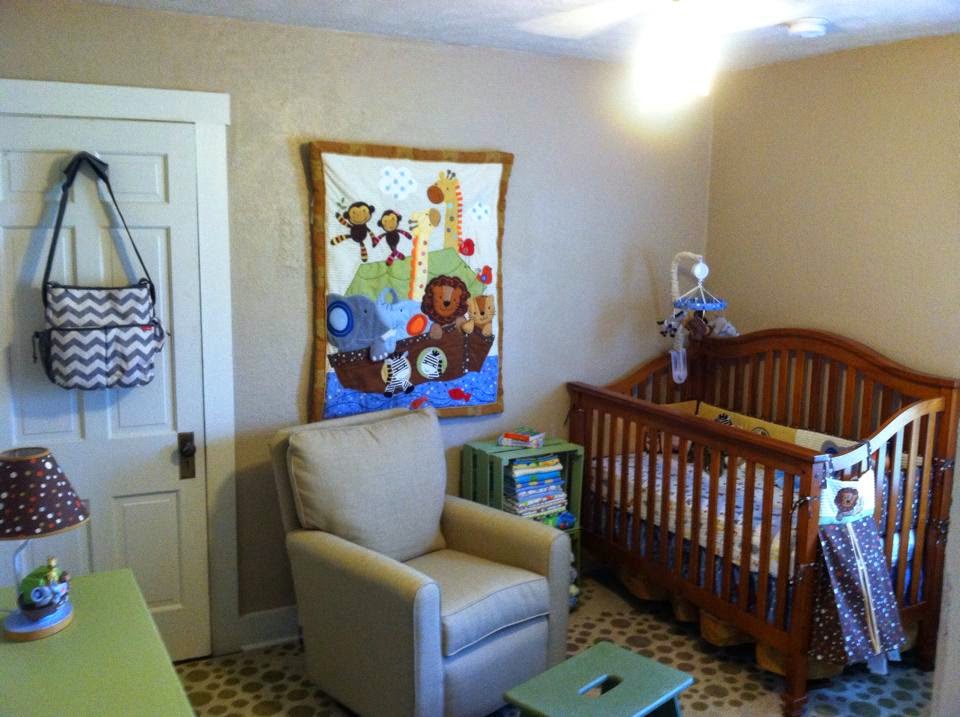
Problem areas in this room included: multiple textures on the walls, a horrible paint scheme, a chair rail, and flooring. To start with, we ripped off the chair rail. Then I undertook the task of completely retexturing the walls. I think I went through at least two 5-gallon buckets of mud for that project. I had to put a thin coat of mud with the trowel, then roll over it with textured sponge roller, then knock down the texture with the trowel. Yes, it took me a few days to finish. (I did try the spray-on texture, but it was no good. Too thin and runny to actually hold, and it didn't cover up the former texture enough for a unified look around the room.) Then we painted everything in Bittersweet Stem, which we also used for other rooms in the house that is from the Rustic Refined collection. Finally, the new wood laminate floor was laid, but you can't see much of it now because we have a rug.

Since this room is right next to our bedroom, it became the nursery. We had a lot of fun decorating with the Noah's Ark theme from Babies R Us. Now we just need to baby to arrive (a few more days, we hope!)

Before:
After:


Thursday, May 8, 2014

Before and After: Utility Room

The utility room had several problems when we bought the house. First, the flooring was totally crummy. I think that the previous owners has let their animals use it as a restroom.... so it was pretty nasty and even though we cleaned it, it still looked crappy (pardon the pun). Also, the washer/dryer hookup was in this room, BUT, we could not figure out where the washer was draining to. I personally wanted to move the washer/dryer downstairs to the basement anyways to get it out of the way. Therefore, we replaced the flooring with the same linoleum that the contractors used in the kitchen, and covered up the washer drain-to-nowhere and moved the machines downstairs.

To finish the utility room, we bough stock cabinets and counter top from Lowe's. Justin cut and installed the cabinets, and I painted them. I would have been nice to get the same cabinets and counter as the kitchen, but it would have cost a lot more and the only thing we would have really gained was the bead board on the front. Otherwise they look pretty similar. (I'll take $500 for the project vs. $2,000 any day.) Patching and painting the walls with the same color as the kitchen, hanging curtains, and adding a picture collage helped to finish the room.

I love having half of the storage space for my crock pots and canning supplies, and Justin uses the other half for easy access to his tools and some gardening supplies. The window light is great for starting plants in the spring, and the counter gives us a place to work. Overall I am really pleased with the space.

Here's the before and after pics:

Friday, April 4, 2014

Before and After: Guest Room

It's been a long time since I've blogged about house projects, and we certainly have done a few. We patched and painted the basement stairwell and stairs, put down wood floors,  put on a new roof, put up lattice to cover the basement crawlspace, revamped the utility room, converted a half bath into a full, and more I'm sure. Sometime, I'll have to blog about those projects.

For now, I thought I would post about the guest bedroom. It is a small room and was very bland, with carpet that was different from every other room in the house (all of the carpet in the house was removed before we moved in). The room itself was finished soon after we moved in. In fact, we slept in the guest room until our master bedroom was finished. This renovation was relatively simple: paint and flooring. We painted (Copen Blue by Sherwin Williams' Rustic Refined palette) when we first moved in, and flooring came about 6 months later. I already had the bed and cabinet, our neighbor contributed the picture and lamp, and my mom sewed the curtains. I really like the colors in this room and the way it turned out.

Before: Nasty carpet, no color

After: New flooring and color!


Monday, August 12, 2013

How to Distress a Dresser

A few years ago, I obtained a mid-century dresser as family hand-me-down. My Uncle Tim didn't have a place for it, and I needed a dresser in my spare room, so I snatched it up. Fast forward a few years, and our new house didn't have a place in our guest room for the dresser, so I decided to use it as a buffet in the dining room. I love it because it givens me lots of linen storage! However, with wood laminate floors and a wood table, I had too many wood finishes and wanted a the buffet to contrast more in the room (see pic on left). So I decided to paint and distress it. Here's how it worked.

First, I roughed up the original finish with sandpaper and removed the hardware. I had to use putty to fill in the holes from the hardware because we changed the knobs. Then, I painted a base coat of yellow paint (leftover from the kitchen) on the dresser. I made sure to have it plenty thick on the edges, because this is where I would be seeing it the most.

Next, I painted the top coat of a brownish-olive color that picks up some of the accents from the rest of the house and the green in the wall color. I did two coats of this. I used enamel from Sherwin-Williams, but next time I think I might try a different type because it wasn't super easy to scrub off for the distressing part.
Finally, I took sandpaper to the dried top coat along the edges and natural wear lines until I had as much yellow showing through as I wanted. I also used a "rough" paintbrush to give it wear on the top and sides since the enamel was pretty hard to distress on the flat surfaces. Sherwin-Williams has these 2-inch brushes for a buck that worked really well for this. 

To finish the piece, we put on new hardware from Lowe's. I didn't want it to look too new, so I rubbed paint over the pieces and then used a dry cloth to give it an aged affect. The knobs and handles were around $1 a piece, and the paint was about $15, so I did the whole dresser for about $25! Nice, right?


Saturday, April 20, 2013

Before and After: Master Bedroom

Today I'm writing about the before and after for the master bedroom. The biggest difference in this room is the paint. We painted the trim in Creamy, the walls in Bittersweet Stem, and the floor in Cocoon, all from Sherwin-Williams' Rustic Refined Collection. With the placement of the windows, it was difficult to decide where to put the bed, but in the end I decided the set it up in front of the back window. I got curtains that basically match the walls, so it doesn't seem like too much of an eyesore. Our bedroom set we got in California, and the comforter and shams were a bargain from TJ Maxx.

Among other things, I like that the bedroom is at the back of the house, because it eliminates any car noise or lights from the street. Not that it's very loud, but we had to sleep in the front bedroom before we finished the master bedroom, and I definitely heard a few cars and kept up by a few headlights. Also, it has three closets! Now, one of them will be eliminated when we make the 1/2 bath into a full bath, but that still leaves a nice-sized one for me, and a smaller one for Justin. The smaller was was a built-in cupboard, but we took off the front because it was very dated and dirty. We patched up inside and painted, and now it's functional. In the pictures, this one is right under the arch, and backs up to my closet.

Now, the half bath originally opened up into the kitchen, and we had to cut a new door and seal over the old one. Right now, it has a curtain in front of it too, because the door frame is a raw edge where you can see three layers of plaster.... not so pretty. Hence, the curtain. That's hopefully a late summer project, but we have to get the roof replaced first, clear out the back hedge, and put down new flooring in the whole house. I'll be sure to blog when it's done though! :)

Before:


After:


Friday, February 22, 2013

Living Room... Before and After

The living room has been done for while, I just haven't posted about it yet... sorry! Since we have an "ice day" off of school today, I have some extra time, so I'll try to remember the whole process from before and after. Though in many ways, I like forgetting about it all!
First, the carpet had fleas. The walls, trim, and fireplace was a worn-out off-white color. The fireplace tiles were gross, which I replaced in this DIY project. An bookshelf took up space on one wall. We ripped it out. After the carpet was removed (as per the contract when we bought the house) we sanded and painted the floor with Cocoon from Sherwin William's Rustic Refined collection. Our family came down over a weekend in the fall, and helped paint the walls with Bittersweet Stem. I replaced the tiles, with Justin's help to tear them out, in December.

I picked up the rug and pillows from Gabriel Brothers, a discount store. The blue chair I got from Goodwill for $5. The coffee table was a DIY project that I got at a garage sale this summer for another $5. I'll have to post more on that later- it was purple to start with) Mom graciously made the curtains, which have a light blue pattern, this fall. And finally, finally, we had the revelation that my hope chest would fit just perfectly in the space between the fireplace and the wall! Dad and mom had a talented wood-working neighbor make these for Bethany, Ratona and I when we were young. They actually all fit together in the window seat of our dormer window at our house in Springfield, but look great separately too. I never took it to Cali when I moved out there... I guess I always knew I would be back here somehow.

I think that pretty much covers all the improvements. Waddaya think?

Tuesday, January 22, 2013

Bathroom: Before and After

Our front bathroom has come a long way. When we first came in the house, there was a mildew problem. The shower, sink and toilet plumbing were on three different walls.  All the fixtures were outdated, and the tub must have been the original cast iron. It was super heavy. So heavy, in fact, that it is still sitting on the side of the house, waiting for someone to be interested in its posting on Craigslist. But I digress...

To fix it, Justin and dad tore everything down to the studs. It sounds easy to say but it took several days! The flooring came up too. When Brentwood came in, they put up new walls and placed the plumbing all on one wall. That was my plan, because it just makes so much more sense! Then, in one night, I painted the walls Bracing Blue (Sherwin Williams) and ceiling and trim Creamy (also Sherwin-Williams). They came in after that and officially hooked up all the fixtures.

Wait, I thought that sounded too easy.... how could I forget? Before they could finish the plumbing, Justin had to dig in the crawlspace to find a good section of pipe to hook into, because the old pipe literally had holes in it. This stopped up the process for at least week. Still, I'm glad that we figured it out at this point.

Once the fixtures were in, I was able to start making finishing touches. I found a shower curtain at HomeGoods  that was pretty close to the color of the tub. If you remember, I spent a few precious hours this summer restoring that old tub that we found on Craigslist for $225.   Xenia Glass and Lock put a mirror in an old frame that I bought at a garage sale. The mirror was $10, the frame about a dollar. (By the way, Xenia Glass and Lock had great service and were so reasonable in price. I'll be going back to replace some glass in a frame soon.) Our awesome neighbor Bert once again helped us with some shelving, and then I painted the shelves. I hung a few other decorations, and it was finished! It's one of my favorite rooms in the house now!

Before:                                                              After:


Monday, December 24, 2012

Kitchen: Before and After

Finally, I am starting to feel like things are coming together. The kitchen isn't all decorated yet, but it's getting there. Here's a quick recap of the process- when we first toured the house, there was weeks-old litter boxes and feces around the floor. It smelled of dung too... A horrible blue-checkered pattern was on the damaged linoleum floor, and the cabinets were probably the originals. The kitchen had an arch in the middle, but it couldn't be seen because it was coved in the cabinets. A awkward layout was also an issue from the placement of the appliances, half-bathroom door, and many entrances.

To remedy this, we had family come help us tear out the cabinets. What a task! Some were completely unscrewed but still on the wall from the layers of paint!! They were heavy too, once we actually yanked them off. This left a lot of patchwork, which I did, and Justin sanded. We also cut a door into the master bedroom, and closed the door to the bath off the kitchen. Justin ripped up the old floor. We painted the walls with White Raisin from the Rustic Refined selection at Sherwin-Williams. Then, we stepped back and Brentwood Builders did the rest. Yay!!

Brentwood put down the new vinyl flooring, which looks like tile even though it's not. They installed the cabinets, which was quite a task since the floor sloped. Evening it out was a pain, I'm sure. They dropped the sink in, put in the electric and new gas line, and finished.

At this point, in mid-November, my kitchen already looked loads better, and I unpacked my kitchen stuff, went grocery shopping, and settled in. But I will wanted some open shelves, so our neighbor Bert (who is amazing!!) made some custom shelves that fit perfectly with the style. We showed him pictures, bought the wood, and then he made them for us. And they look great. We got these in just a week or so ago, and that's why I've been waiting to post, though many people have been asking for pictures. We still have more decorating to do, but this is where we are at now. I'm so pleased!!

BEFORE:


AFTER:

Thursday, November 1, 2012

Sneak peek at the bathroom

Finally, all the drain and plumbing issues are resolved and the bathroom is in place! The walls are painted Bracing Blue and the tub is Antiquity, both from the Rustic Refined HGTV/Sherwin-Williams collection. I don't have decorations up or anything, but what do you think so far? I like it!

Monday, October 15, 2012

Autumn Weather...Surprise!

That old saying still rings true, "If you don't like the weather in Ohio, stick around for a day and it will change." After being on the cooler side this week, Friday and Saturday brought some warm weather. It was perfect for refinishing the deck and enjoying being outside. I took the opportunity to plant some of the bulbs that grandma had saved for me- I can't wait to see them come up next spring. Hopefully I did everything right and they survive the winter.

Our big tree in the backyard is shedding its leaves rather quickly. I swear I could probably rake leaves twice a day. It is so beautiful though; I am going to miss the leaves once they are all gone. Seeing them come back again next year is going to be a joy; hopefully we have some porch furniture by then and can have people over to enjoy. But for now, the weather has turned windy and rainy again, and we will stay inside!

Speaking of inside, Justin had to dig a trench in the basement this weekend for the new water line for the washer. Apparently the drainage was a problem in the utility room, so the washer and dryer will be moved downstairs. We actually wanted that in the first place, just to get it out of the way. But all the little changes add up in the cost... At least we will save a little from Justin doing the digging.

We also finally finished tearing out the cabinets, mudding and sanding the kitchen this weekend, and were able to get a coat of paint on the walls. It makes such a difference. I am definitely starting to get excited about seeing the flooring, cabinets, and countertops come together as well. Only two weeks or so till it is all done! (I think I can wait that long...)


Wednesday, October 10, 2012

Homeowners in week four...

It is crazy that we have had the house for four weeks now. In some ways I feel like we have gotten a ton done, in other ways we still have so much to do. I think that is because there are a few things in each room that aren't finished. For example, the master bedroom still needs the floor painted and the new door cut for the bathroom. The family room needs to have the new section of drywall put up, but we can't do that until the roof is fixed. Another instance is the kitchen- we have the floor taken up, the cabinets taken out, but we are still working on the walls. Then the utility room has been painted, but still needs new flooring. So, we have made progress, but so many finishing touches still need to be done.

Monday and Tuesday consisted of sanding down the patched drywall in the kitchen, which Justin mostly worked on. Bert was amazing, again, and painted the utility room in White Raisin from our Rustic Refined color scheme from Sherwin-Williams, which I have been blogging about. I really like how the color turned out, and this is the same color that we will use in the kitchen. Also, I worked on painting the three walls in the master bedroom that won't be affected when we make the full bath. It sounds easy, but there is a lot of trim work to take care of- three windows, several doors, and the baseboard and ceiling. It just takes some time. (Unfortunately, I don't have any pictures to post of me actually working... guess it's hard to take pictures of myself- someone should get on that!)

Today dad helped Justin get the claw foot tub over to the house (finally!!) in the evening before church. The plumbers were able to come early because they needed the exact measurements. They took the plumbing for the kitchen sink out, so now we only have one functional sink. And that one's not even very good because it gets jammed so often! Justin found a decent amount of quarters in the pipes that the plumbers took out. I think we'll rinse it off and give it to church. Speaking of money, we hope to cash in on that old cast-iron tub that is now out of the bathroom too. That is, if no one takes it off of the front porch. I think it's a couple of hundred pounds though, so that might be a bit of a discouragement. But that's all for now. More to come in the next few days!


And a silly kiss to end the night... I was trying to stay away from too much dust.. LOL
 

Sunday, October 7, 2012

Homeowners make progress in the kitchen

Well, we are making some progress on the kitchen. Justin got the floor completely ripped up this weekend. Then I started patching trouble spots on the wall from where the cabinets came out. Since we are installing open shelving on two of the three walls, I had quite a bit to patch. I finished the first round yesterday, and today Justin worked on sanding it down. I felt bad that he had to do all this, but my eye gets irritated from the dust, so he has to do it. By the time he was done it looked liked the kitchen had been through a snowstorm- it was pretty white. Justin's hair looked like it was gray. tehehe... in 30 years... Good thing I put up some plastic over the doorways, or the dust would have been everywhere. But I still need to go over it again to make it really smooth after we pick up some more drywall mud... we uh, ran out....


While he did that, I worked on painting a first coat on the bedroom that I had done trim work on yesterday. It's the master bedroom, and I can only do three of the four walls right now because we have to cut a door in one wall for the bathroom. You see, there is a four-foot space between the kitchen and the master bedroom that has a half-bath and a closet. Our plan, eventually, is to take down the wall between the closet and half-bath so that it can be a full bath. We will have it open into the bedroom instead of the kitchen, so it's not an awkward bathroom off the kitchen. Plus that opens up a wall for more storage space. Sometime maybe I'll post the drawings of how this works, because I'm sure that it doesn't make much sense to read.

Our awesome neighbor Bert came over to say hello and ask what he could help with tomorrow morning. So I gave him the utility room to paint in White Raisin, the same color the kitchen will be in. It's a pale yellow that is part of the Rustic Refined color scheme from Sherwin-Williams. Speaking of, we need to go pick up a few more gallons since we got a coupon over email about another sale. I think we are almost done with buying paint now though, thank goodness!

Oh yea, and Bert had us come over to eat some of the carrot cake that he made. He's the best neighbor EVER!!!