Showing posts with label Demolition. Show all posts

Friday, May 9, 2014

Before and After: Nursery

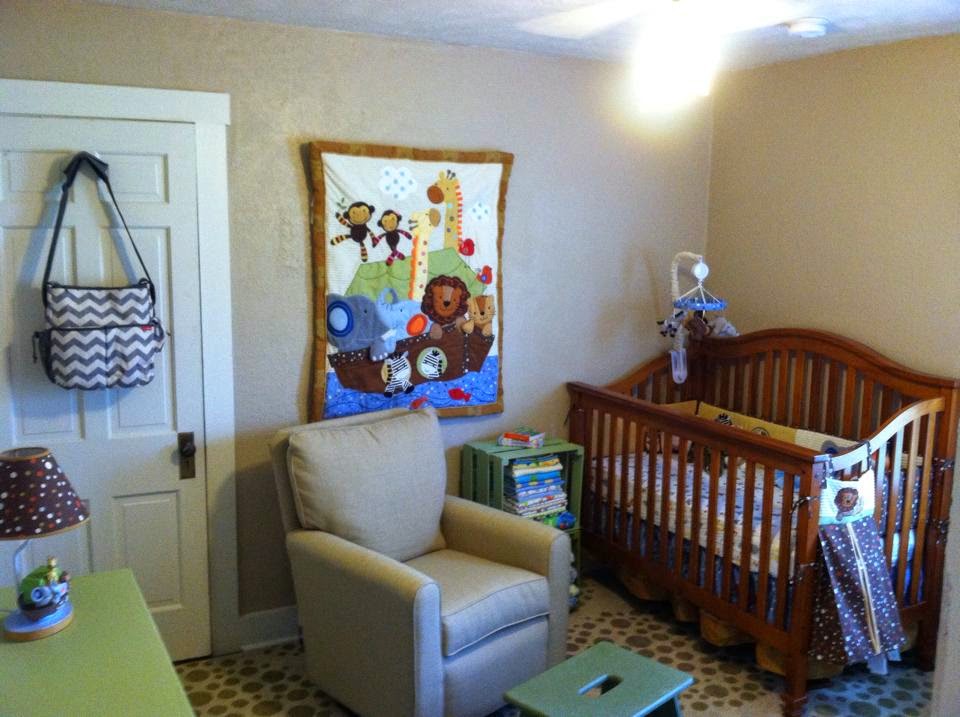
Problem areas in this room included: multiple textures on the walls, a horrible paint scheme, a chair rail, and flooring. To start with, we ripped off the chair rail. Then I undertook the task of completely retexturing the walls. I think I went through at least two 5-gallon buckets of mud for that project. I had to put a thin coat of mud with the trowel, then roll over it with textured sponge roller, then knock down the texture with the trowel. Yes, it took me a few days to finish. (I did try the spray-on texture, but it was no good. Too thin and runny to actually hold, and it didn't cover up the former texture enough for a unified look around the room.) Then we painted everything in Bittersweet Stem, which we also used for other rooms in the house that is from the Rustic Refined collection. Finally, the new wood laminate floor was laid, but you can't see much of it now because we have a rug.

Since this room is right next to our bedroom, it became the nursery. We had a lot of fun decorating with the Noah's Ark theme from Babies R Us. Now we just need to baby to arrive (a few more days, we hope!)

Before:
After:


Thursday, December 27, 2012

Updating Fireplace Tile

The bland, red-ish, dirty tiles in front of the fireplace had been bothering me for some time. We had already updated the brick with paint, which helped A LOT! But, the tile in front still looked pretty crappy. So finally, over the last few days, we had some extra time. Justin started the process by ripping up the old tile. Then we went to Lowes to get some tile. We got some tile for .58 cents for 6x6 pieces. The 3x12 was around $3. All together, we spent about $30 on the tile and $25 on the grouting materials.

That morning, I had played around with the tile pattern by cutting out paper patterns. While this wasn't exact, it really helped me know how many tiles I needed and how we needed to cut it.

After Justin mixed up the adhesive, I had to try to level out the surface because it definitely slanted down from the fireplace. Placing the tiles was a little tricky, because I had more spacing on the outside border than on the inside diagonal pattern. (Maybe we should have gotten the spacers). I went and cleaned up in the kitchen while it dried for a a little time. Next, I used a large sponge to start wiping off the excess grout and clean up. After the first round, it dries and then I was able to just use a towel to wipe off the final layer. I must say, I'm pretty proud of myself with this tile job. I think it looks pretty darn good!


Saturday, October 20, 2012

Walling up a door frame

After we cut the door frame out yesterday, it was time to put framing and drywall in so could make it disappear. Justin had a little bit of experience with framing, so he put in the 2x4's after trimming them to size. Then he cut the drywall to size and hung it with screws. Sure, he's not a pro, but it did the job.
 
After that, I started mudding up the seams. This is the most frustrating part because mudding is truly frustrating for the novice. The professional that drywalled the bathroom was a pro- he was so skilled and didn't seem to sweat it at all. But me, I take a lot of time, and still I don't think that I am too good. I am getting a little better with keeping the edges smooth, but I know that Justin will still have to sand quite a bit. But this was just the first coat, and we will hopefully get it where it needs to be. We did use the drywall mesh on the seams, which seemed to help. Now we just wait for it to dry and then finish it off.


Friday, October 19, 2012

Cutting a door frame

We got the door frame for the bathroom entrance cut!! You see, right now the door for the half-bath opened into the kitchen. However, we are covering up that door and having it open into the master bedroom. Eventually we will break down the wall the sink is on and open it up longer to create a full bath. But for now, we just need to close up the wall into the kitchen and open another door frame into the master bedroom.
 
We had a family friend who is really handy come over to help us with this. The first thing that he had to do was make sure that when we cut through the wall, we weren't going to run into any electrical problems. This ended up being a little difficult, because he had to go through a very small hole to get to the crawlspace under the bedroom to try to figure out what the wiring was doing.
 
After he figured that part out, he started going into the wall on the inside of the half-bath with a sawzall very carefully. It was uber dusty too! Whew- wear a mask over your eyes and mouth if you do this at home! We had measured out and found where the studs were so that we would only have to cut through one stud. That stud was in the middle of the new door frame, and we will have to put a brace across the top when we frame it in. The electrical wiring will need to be rerouted either under the door or over the top- that's for another day though.
 
Justin stood on the other side of the wall as our friend cut the the section of wall for the door to come out. It was pretty heavy too! It took both of them to lift and move it once they had it out, but thank goodness it was all in once piece. (That side of the wall has unique texturing, and we are hoping to be able to use it when we patch another area). Having the door frame cut out now is such a huge piece of progress, because we can now put new drywall up  on the kitchen wall and paint before the new cabinets are put in. Below you can see the process.
 
      Before any cutting  -------------------> First cuts on the inside of the bathroom

Outline cut in the inside of the bath ----->Justin holding the wall piece steady as it comes out

 The new cut door frame... but NO PRIVACY!!
 I'll have to put up a curtain or something until we get it finished.
This is our only working bathroom right now! LOL....

Now we need to frame it up and get that drywall up. It never ends!! But we are glad to be working on our own home! God is good.

Monday, October 15, 2012

Autumn Weather...Surprise!

That old saying still rings true, "If you don't like the weather in Ohio, stick around for a day and it will change." After being on the cooler side this week, Friday and Saturday brought some warm weather. It was perfect for refinishing the deck and enjoying being outside. I took the opportunity to plant some of the bulbs that grandma had saved for me- I can't wait to see them come up next spring. Hopefully I did everything right and they survive the winter.

Our big tree in the backyard is shedding its leaves rather quickly. I swear I could probably rake leaves twice a day. It is so beautiful though; I am going to miss the leaves once they are all gone. Seeing them come back again next year is going to be a joy; hopefully we have some porch furniture by then and can have people over to enjoy. But for now, the weather has turned windy and rainy again, and we will stay inside!

Speaking of inside, Justin had to dig a trench in the basement this weekend for the new water line for the washer. Apparently the drainage was a problem in the utility room, so the washer and dryer will be moved downstairs. We actually wanted that in the first place, just to get it out of the way. But all the little changes add up in the cost... At least we will save a little from Justin doing the digging.

We also finally finished tearing out the cabinets, mudding and sanding the kitchen this weekend, and were able to get a coat of paint on the walls. It makes such a difference. I am definitely starting to get excited about seeing the flooring, cabinets, and countertops come together as well. Only two weeks or so till it is all done! (I think I can wait that long...)


Wednesday, October 10, 2012

Homeowners in week four...

It is crazy that we have had the house for four weeks now. In some ways I feel like we have gotten a ton done, in other ways we still have so much to do. I think that is because there are a few things in each room that aren't finished. For example, the master bedroom still needs the floor painted and the new door cut for the bathroom. The family room needs to have the new section of drywall put up, but we can't do that until the roof is fixed. Another instance is the kitchen- we have the floor taken up, the cabinets taken out, but we are still working on the walls. Then the utility room has been painted, but still needs new flooring. So, we have made progress, but so many finishing touches still need to be done.

Monday and Tuesday consisted of sanding down the patched drywall in the kitchen, which Justin mostly worked on. Bert was amazing, again, and painted the utility room in White Raisin from our Rustic Refined color scheme from Sherwin-Williams, which I have been blogging about. I really like how the color turned out, and this is the same color that we will use in the kitchen. Also, I worked on painting the three walls in the master bedroom that won't be affected when we make the full bath. It sounds easy, but there is a lot of trim work to take care of- three windows, several doors, and the baseboard and ceiling. It just takes some time. (Unfortunately, I don't have any pictures to post of me actually working... guess it's hard to take pictures of myself- someone should get on that!)

Today dad helped Justin get the claw foot tub over to the house (finally!!) in the evening before church. The plumbers were able to come early because they needed the exact measurements. They took the plumbing for the kitchen sink out, so now we only have one functional sink. And that one's not even very good because it gets jammed so often! Justin found a decent amount of quarters in the pipes that the plumbers took out. I think we'll rinse it off and give it to church. Speaking of money, we hope to cash in on that old cast-iron tub that is now out of the bathroom too. That is, if no one takes it off of the front porch. I think it's a couple of hundred pounds though, so that might be a bit of a discouragement. But that's all for now. More to come in the next few days!


And a silly kiss to end the night... I was trying to stay away from too much dust.. LOL
 

Sunday, October 7, 2012

Homeowners make progress in the kitchen

Well, we are making some progress on the kitchen. Justin got the floor completely ripped up this weekend. Then I started patching trouble spots on the wall from where the cabinets came out. Since we are installing open shelving on two of the three walls, I had quite a bit to patch. I finished the first round yesterday, and today Justin worked on sanding it down. I felt bad that he had to do all this, but my eye gets irritated from the dust, so he has to do it. By the time he was done it looked liked the kitchen had been through a snowstorm- it was pretty white. Justin's hair looked like it was gray. tehehe... in 30 years... Good thing I put up some plastic over the doorways, or the dust would have been everywhere. But I still need to go over it again to make it really smooth after we pick up some more drywall mud... we uh, ran out....


While he did that, I worked on painting a first coat on the bedroom that I had done trim work on yesterday. It's the master bedroom, and I can only do three of the four walls right now because we have to cut a door in one wall for the bathroom. You see, there is a four-foot space between the kitchen and the master bedroom that has a half-bath and a closet. Our plan, eventually, is to take down the wall between the closet and half-bath so that it can be a full bath. We will have it open into the bedroom instead of the kitchen, so it's not an awkward bathroom off the kitchen. Plus that opens up a wall for more storage space. Sometime maybe I'll post the drawings of how this works, because I'm sure that it doesn't make much sense to read.

Our awesome neighbor Bert came over to say hello and ask what he could help with tomorrow morning. So I gave him the utility room to paint in White Raisin, the same color the kitchen will be in. It's a pale yellow that is part of the Rustic Refined color scheme from Sherwin-Williams. Speaking of, we need to go pick up a few more gallons since we got a coupon over email about another sale. I think we are almost done with buying paint now though, thank goodness!

Oh yea, and Bert had us come over to eat some of the carrot cake that he made. He's the best neighbor EVER!!!

Friday, October 5, 2012

Homeowners... tearing out the kitchen floor

After sorta-kinda playing around the edges, Justin went all out tonight in ripping up the kitchen floor. Thank goodness that it was a little easier than expected. At the advice of our contractors, Justin took out the plywood and linoleum at the same time. The kitchen didn't have as many layers as the bathroom- thank goodness! Still, he did have to use a pry bar and hammer to loosen it up before ripping it out. For safety, he wore goggles and gloves. He got almost all of it out! This was a big start because the kitchen is our weekend project.

After he gets the floor out, we really need to start patching the walls from where the cabinets were ripped out.  Getting it patched is going to take some time, because I'm sure we will have to go over it a few times. Sanding it down is a pain too; we've been doing that in other rooms. Then everything gets washed down and a coat of paint. But we are saving a lot of money and time once the contractors come in to work, so I think it is worth it.

One thing I noticed is that there is a smell from the floor... I cant' quite describe it. Like something needs air that has been trapped for a long time... or maybe it's just the smell of the adhesive. But it's weird and I hope that it airs out soon. With the house being built in 1935, somehow I'm always worried about toxic fumes.

Anyways, here is the progress for today:


Thursday, October 4, 2012

Homeowners... still gutting the bathroom

Quite a bit of progress on the bathroom was made this weekend. However, the floor was still in place. With a later start tonight, Justin figured that it was a small space so he would get done what he could. An inch and three layers later, he's still working. I sure hope he's not inhaling some toxic mess...

As you can see from the pictures, it's pretty much any and every tool that you can find to try to get through the layers underneath. Thank goodness our contractor is delivering the dumpster a week early, because all that crap in the bathtub needs to be taken out ASAP so Justin can actually get the tub and floor under the tub out. One day at a time though!